Private messaging - Part IV
This guide has four distinct parts:
- Part I: initial implementation
- Part II : persistent user ID
- Part III : persistent messages
- Part IV (current): scaling up
Here's where we were at the end of the 3rd part:
We will see now how we can scale to multiple Socket.IO servers, for high availability / load-balancing purposes.
Installation#
Let's checkout the branch for part IV:
git checkout examples/private-messaging-part-4Here's what you should see in the current directory:
├── babel.config.js├── package.json├── public│ ├── favicon.ico│ ├── fonts│ │ └── Lato-Regular.ttf│ └── index.html├── README.md├── server│ ├── cluster.js (created)│ ├── docker-compose.yml (created)│ ├── index.js (updated)│ ├── messageStore.js (updated)│ ├── package.json (updated)│ └── sessionStore.js (updated)└── src ├── App.vue ├── components │ ├── Chat.vue │ ├── MessagePanel.vue │ ├── SelectUsername.vue │ ├── StatusIcon.vue │ └── User.vue ├── main.js └── socket.jsThe complete diff can be found here.
Updating the server#
For this last part, we need 3 additional dependencies on the server-side:
ioredis: a great Redis clientsocket.io-redis: a Socket.IO adapter based on Redis pub/sub mechanism@socket.io/sticky: a module for running Socket.IO within a Node.js cluster
We also need a Redis instance. For your convenience, a docker-compose.yml file is provided:
cd serverdocker-compose up -d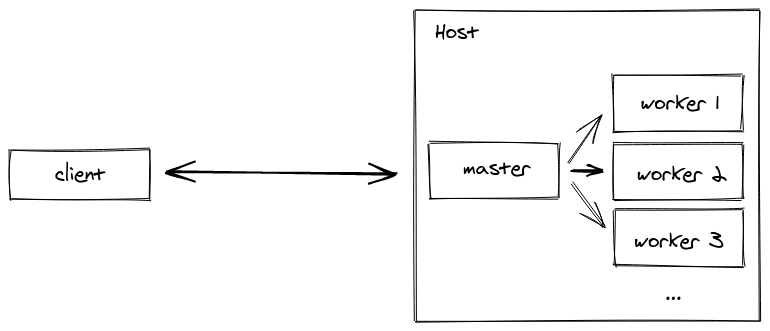
npm installnpm startThis will create 4 Node.js workers, each running the same index.js file.
On the client-side, no change is needed, we will focus on the server-side here.
How it works#
Creating multiple servers#
When creating multiple Socket.IO servers, there are two things to do:
- you need to enable sticky-session (please see here for the complete explanation)
- you need to replace the default in-memory adapter with the Redis adapter (or another compatible adapter)
In our example, the @socket.io/sticky module is used to ensure that requests from a given client are always routed to the same Socket.IO server. This is what is called "sticky-session":
Note: we could also have created several processes listening to different ports (or used multiple hosts), and add a reverse-proxy in front of them. Enabling sticky-session for common reverse-proxy solutions like NginX or HAProxy is covered in the documentation.
The cluster is created in the server/cluster.js file:
const cluster = require("cluster");const http = require("http");const { setupMaster } = require("@socket.io/sticky");
const WORKERS_COUNT = 4;
if (cluster.isMaster) {  console.log(`Master ${process.pid} is running`);
  for (let i = 0; i < WORKERS_COUNT; i++) {    cluster.fork();  }
  cluster.on("exit", (worker) => {    console.log(`Worker ${worker.process.pid} died`);    cluster.fork();  });
  const httpServer = http.createServer();  setupMaster(httpServer, {    loadBalancingMethod: "least-connection", // either "random", "round-robin" or "least-connection"  });  const PORT = process.env.PORT || 3000;
httpServer.listen(PORT, () => console.log(`server listening at http://localhost:${PORT}`) );} else { console.log(`Worker ${process.pid} started`); require("./index");}In our existing server/index.js file, there is a single change: the HTTP server created by the worker process does not actually listen to a given port, the requests will be handled by the master process and then forwarded to the right worker.
Before:
httpServer.listen(PORT, () => console.log(`server listening at http://localhost:${PORT}`));After:
setupWorker(io);The setupWorker method provided by the @socket.io/sticky will take care of the synchronization between the master and the worker.
Sessions & messages#
Now that sticky-session is enabled, we need to share sessions and messages across the Socket.IO servers.
We create a new SessionStore based on Redis. We will store each session in a Redis hash, with the HSET command:
class RedisSessionStore extends SessionStore { // ... saveSession(id, { userID, username, connected }) { this.redisClient .multi() .hset(`session:${id}`, "userID", userID, "username", username, "connected", connected) .expire(`session:${id}`, SESSION_TTL) .exec(); } // ...}We also set an expiry to the key in order to clean up old sessions.
Fetching the session is quite straightforward, with the HMGET command:
const mapSession = ([userID, username, connected]) =>  userID ? { userID, username, connected: connected === "true" } : undefined;
class RedisSessionStore extends SessionStore { // ... findSession(id) { return this.redisClient .hmget(`session:${id}`, "userID", "username", "connected") .then(mapSession); } // ...}Fetching all sessions is a bit more complex:
class RedisSessionStore extends SessionStore {  // ...  async findAllSessions() {    // first, we fetch all the keys with the SCAN command    const keys = new Set();    let nextIndex = 0;    do {      const [nextIndexAsStr, results] = await this.redisClient.scan(        nextIndex,        "MATCH",        "session:*",        "COUNT",        "100"      );      nextIndex = parseInt(nextIndexAsStr, 10);      results.forEach((s) => keys.add(s));    } while (nextIndex !== 0);
// and then we retrieve the session details with multiple HMGET commands const commands = []; keys.forEach((key) => { commands.push(["hmget", key, "userID", "username", "connected"]); }); return this.redisClient .multi(commands) .exec() .then((results) => { return results .map(([err, session]) => (err ? undefined : mapSession(session))) .filter((v) => !!v); }); }}Similarly, we create a new MessageStore based on Redis. We will store all the messages linked to a given user in a Redis list, with the RPUSH command:
class RedisMessageStore extends MessageStore { // ... saveMessage(message) { const value = JSON.stringify(message); this.redisClient .multi() .rpush(`messages:${message.from}`, value) .rpush(`messages:${message.to}`, value) .expire(`messages:${message.from}`, CONVERSATION_TTL) .expire(`messages:${message.to}`, CONVERSATION_TTL) .exec(); } // ...}Retrieving the messages is done with the LRANGE command:
class RedisMessageStore extends MessageStore { // ... findMessagesForUser(userID) { return this.redisClient .lrange(`messages:${userID}`, 0, -1) .then((results) => { return results.map((result) => JSON.parse(result)); }); }}Forwarding messages#
There is one last modification that is needed: we need to make sure that messages actually reach the recipient, even if this recipient is not connected on the same Socket.IO server:
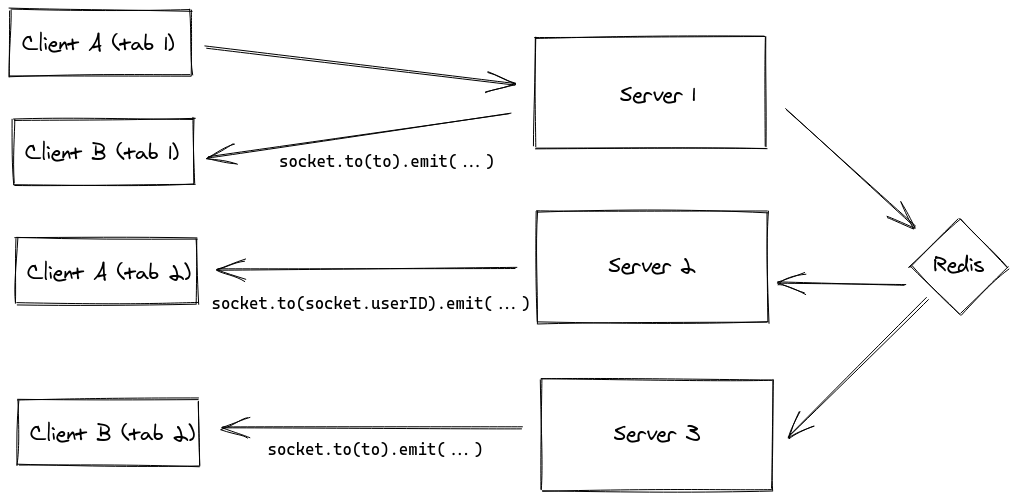
This is the duty of the Redis adapter, which relies on the Redis pub/sub mechanism to broadcast messages between the Socket.IO servers and eventually reach all clients.
const httpServer = require("http").createServer();const Redis = require("ioredis");const redisClient = new Redis();const io = require("socket.io")(httpServer, { cors: { origin: "http://localhost:8080", }, adapter: require("socket.io-redis")({ pubClient: redisClient, subClient: redisClient.duplicate(), }),});And that's it! If you have a Redis CLI on your machine, you can check the messages that are sent on the wire:
$ redis-cli127.0.0.1:6379> PSUBSCRIBE socket.io*Reading messages... (press Ctrl-C to quit)1) "psubscribe"2) "socket.io*"3) (integer) 11) "pmessage"2) "socket.io*"3) "socket.io#/#"4) "\x93\xa6XFD3OF\x83..."Documentation:
Note: with the Redis adapter, the allSockets() method which is used in the "disconnect" handler automatically returns the Socket IDs across all Socket.IO servers, so there is nothing to update.
Review#
OK, so let's sum it up: we have created a fully functional chat (yes, once again!), robust, ready to scale horizontally, which allowed us to introduce some useful Socket.IO features:
- middlewares
- rooms
- scaling to multiple Socket.IO servers
Thanks for reading!